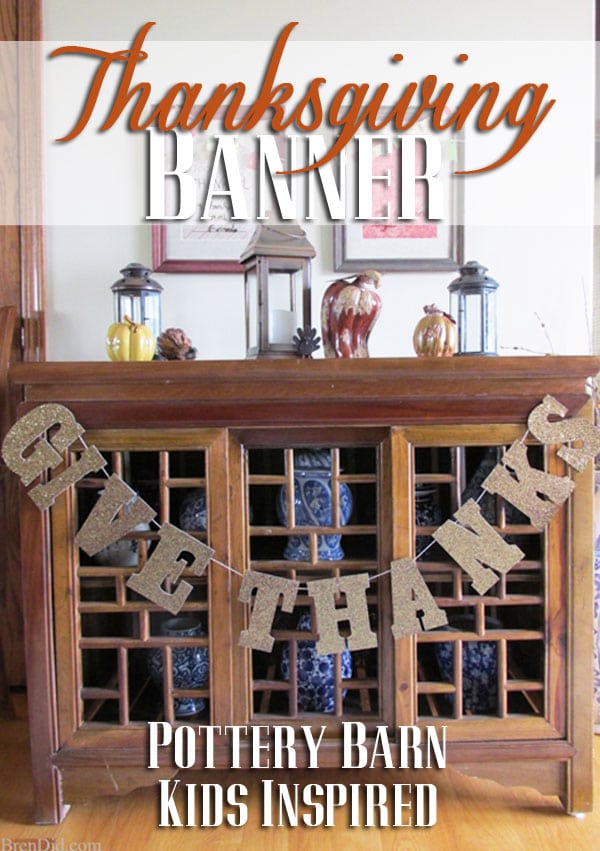
Add some sparkle to your Thanksgiving with this Pottery Barn Kids Inspired Thanksgiving Garland. It’s the perfect way to dress up a fireplace, foyer, or entertainment center. Get the free printable pattern today!

This post uses affiliate links. They don’t cost you a thing and help us bring you creative projects. Read more in Policies & Disclosures.
Garlands are a fun decorating idea for any holiday. You can use them to dress up any room, string them across your mantle, spruce up a bookcase, or welcome guests. I love paper garlands because they are easy to store and don’t have to cost a lot of money.
I love this Give Thanks Glitter Garland from the Pottery Barn Kids fall catalog, but was disappointed when I realized that it was already sold out. Luckily it’s a very easy Thanksgiving craft: just print the free stencils, trace them onto glitter cardstock, cut and tape.
In just a few minutes you can add a little bit of sparkle to your Thanksgiving decor!

I love holiday banners from Pottery Barn and Pottery Barn Kids (check out my Merry Christmas Garland, Easter Bunny Banner tutorial or one of my Halloween banner tutorials). Unfortunately, I do not love paying $22 for a decoration make of card stock and glitter!

How to Make a Glitter Thanksgiving Garland
This papercraft garland tutorial is one of my simplest Thanksgiving decorating ideas! Gather your supplies and in just a few minutes you can have your own Give Thanks garland.
Supplies
- Free Printable PDF Pattern or SVG Cut Filet
- Gold Glitter Card Stock (12 x 12), 2 sheets
- Tan Baker’s Twine, 5-6 feet
- Shipping Tape or Washi Tape
Directions
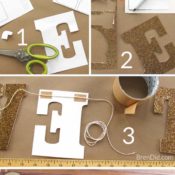
1. Get the Printable PDF Pattern or SVG Cut Filetand cut out the letters.

2. Trace the letters backward on the back of the glitter cardstock and cut out the letters.

3. Tape the letters to the twine. Start in the middle to insure even spacing. Leave 1 inch between each letter and 2.5 inches between the words.

4. Enjoy your banner!
Thanksgiving Garland Cost
- Glitter card stock (approximately $1 to $1.99 a sheet)
- Baker’s Twine ($0.20 a yard)
- Box tape, pen or marker, and printer paper. (I already had these items on hand.)
- Total price= $2.40
That’s a $19.60 savings (89% off). You can make all your Thanksgiving guests a banner at this price!

I LOVE my new banner that reminds us to “Give Thanks” this Thanksgiving…..and I love the savings from my DIY papercraft.
More Thanksgiving Crafts
Make sure you check out my other Thanksgiving craft ideas and free printables.

I Am Thankful printable dry erase boards are a great way to show thankfulness each day.
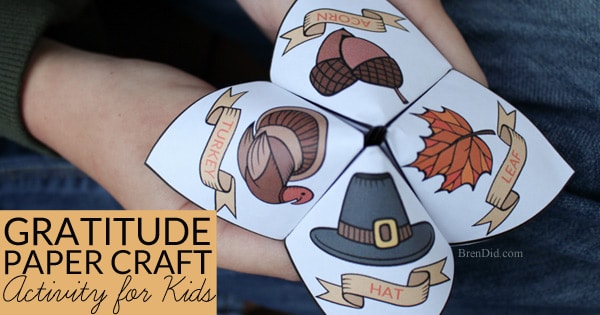
Gratitude Cootie Catchers help kids express gratitude daily.
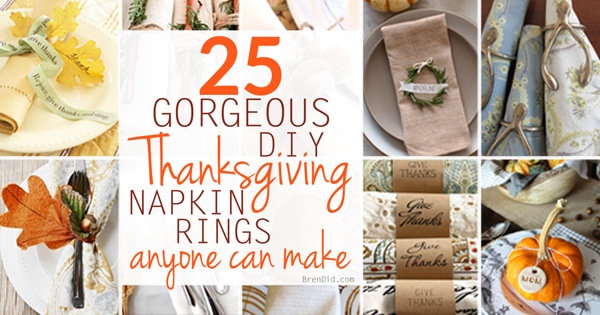
These 25 gorgeous napkin ring DIYs will inspire you o dress up your table.
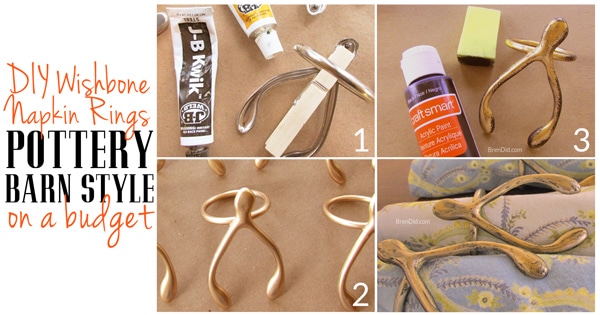
Wishbone napkin rings are the perfect accent decor for your celebration.
Thanks for stopping by! Subscribe to my free weekly email below and never miss a DIY project!

Terry
Thank you for the nice newsletter with a reminder to be “thankful”. The crafts are so much fun and I shared some with my granddaughter during my visit to Germany in October. Best wishes to you and yours.!
Bren
Thanks Terry!
Jessica Daniels
Do you mind sharing the Font and Text Size you used on your Silhouette to create these letters? I am wanting to do the same thing but use a different phrase for the season.
Thank You
Bren
Jessica, I used the free font Cairo . You can download it at DaFont. Mine is 450 size type with some distortion to make is wider (I used Photoshop). Using 450-460 size font will get you very close to the same look. I’d love to see a picture of your finished banner. Hope this helps! What phrase are you making?
Jessica Daniels
Thanks so much Bren for the information, I am going to start working on it now 🙂 I am making the saying “Baby Its Cold Outside”. I am going to cut it with gold poster board and attach with red ribbon and wrap it around my Christmas tree this year 🙂 This is my very first project on the Silhouette machine, so wish me luck, and I will share when it’s done!
Bren
This sounds so cute! Be careful with a super, brand new sticky mat and thick glitter paper. My paper separated and stuck to the mat. It worked better with a slightly used (less sticky) mat and a double cut.