Have you seen all the gorgeous DIY mugs floating around the internet? There are handmade mugs with beautiful artistic designs, inspiring quote, and silly jokes. I love the custom look and have been itching share this easy Sharpie mug tutorial.
 T
T
This post uses affiliate links. They don’t cost you a thing and help us bring you creative projects. Read more in Policies & Disclosures.
A “No Artistic Skills Required” Project
I am crafty but, unfortunately, not artistic! Seriously. I’m even bad at drawing the little guy in a game of hangman.
This means that I do not have the ability to make the gorgeous freehand Sharpie mugs created by my friend Anada at A Piece of Rainbow. Freehand designs would result in one ugly mug if I was the artist!
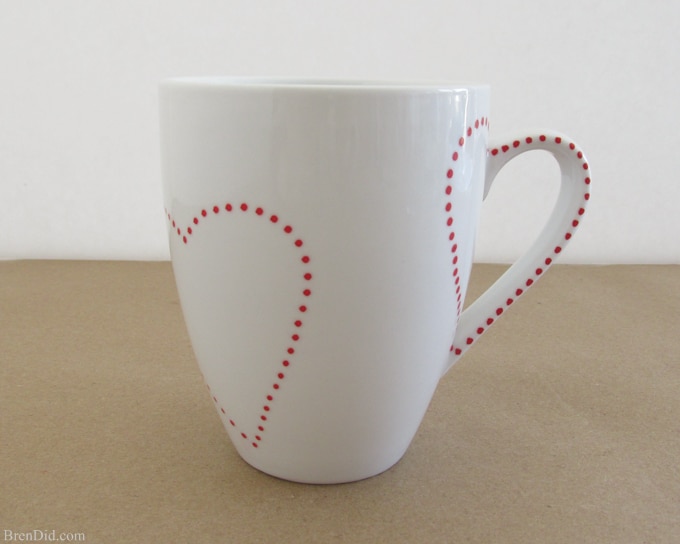
If you’re crafty, but not an artist you’re in luck! You can use this SUPER EASY Sharpie Mug tutorial creates a heart handle mug with a simple stencil… no artistic talent or drawing skills needed!
Mug Supplies
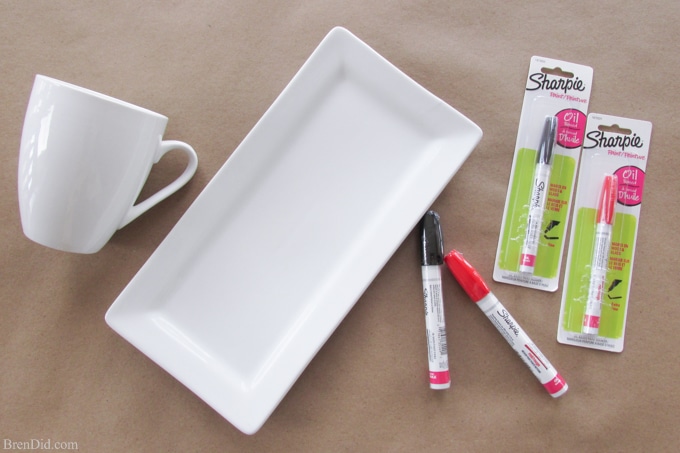
- Mug with Heart Shaped Handle – Look for a mug with a curved handle that resembles half of a heart. (The mug used in this tutorial can be purchased here for $3.00 or grab this $1 version.)
- Sharpie Oil-Based Paint Pens – Sharpie Oil-Based Paint Pens with a fine or medium tip make great dots. (I used red and gold in this tutorial.)
- Rubbing alcohol or Vodka – Use an alcohol cleaner to remove dirt and oils from the surface before decorating.
- Oven or Sealant (optional)- Some DIYers like to finish the mugs by baking or sealing to help the Sharpie design last longer. See recommendations below.

Sharpie Mug Tutorials
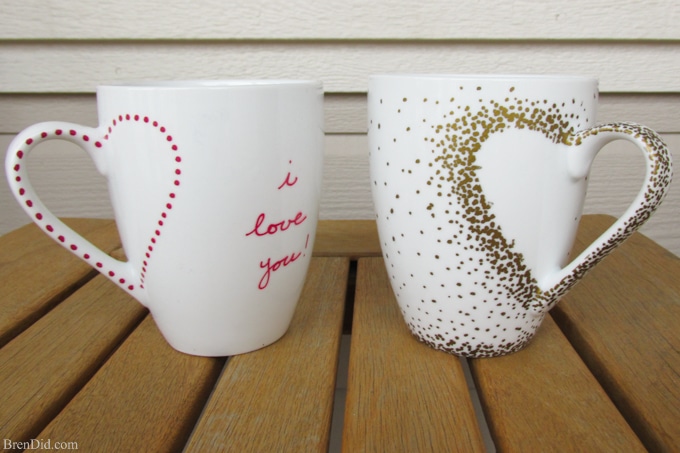
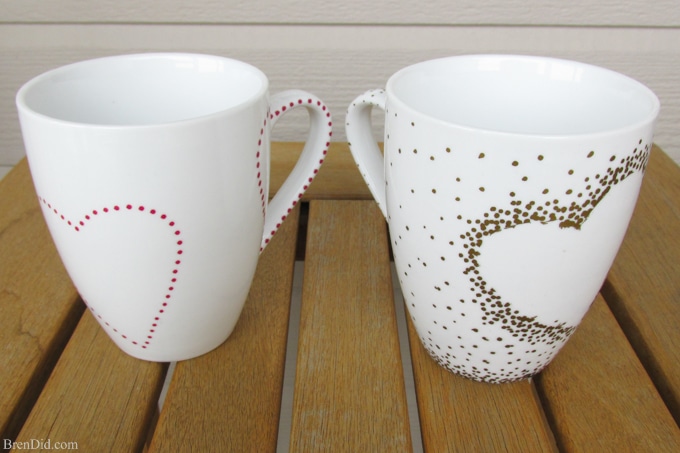
Use these easy tutorials to make 2 style of Sharpie mugs: a heart handle mug or a gold heart mug
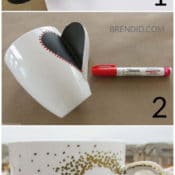
Heart Handle Mug
1. Prepare the mug.
- Remove all labels then wash and dry each mug. Wipe the surface to be painted with rubbing alcohol or vodka to remove any fingerprints or oils. Allow to air dry.
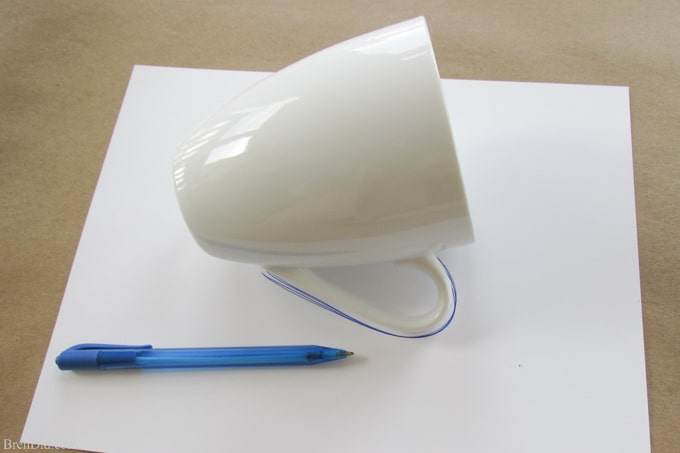
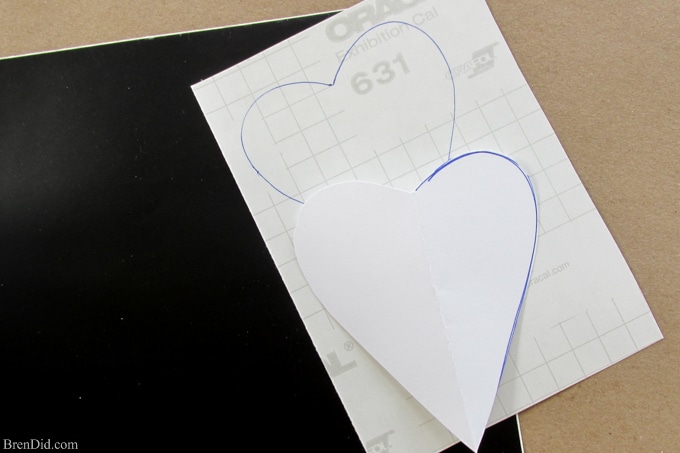
2. Make a heart stencil to match the mug handle.
- Trace the handle of your mug onto paper.
- This pattern will form one side of the heart. (It’s just like making paper hearts in grade-school!)
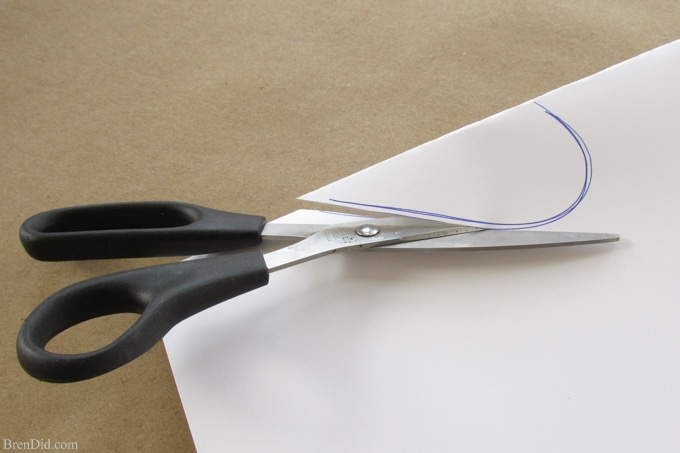
- Fold the paper in half along the edge of your tracing then cut along the line.
- Unfold the paper to reveal a paper heart.
- Check to see that the heart shape is the same size as the mug handle.
- Trace the heart onto the back of a piece of contact paper.
- Any color of contact paper or adhesive vinyl will work.
- It is easier to see the pattern if the contact paper is a different color than the mug.
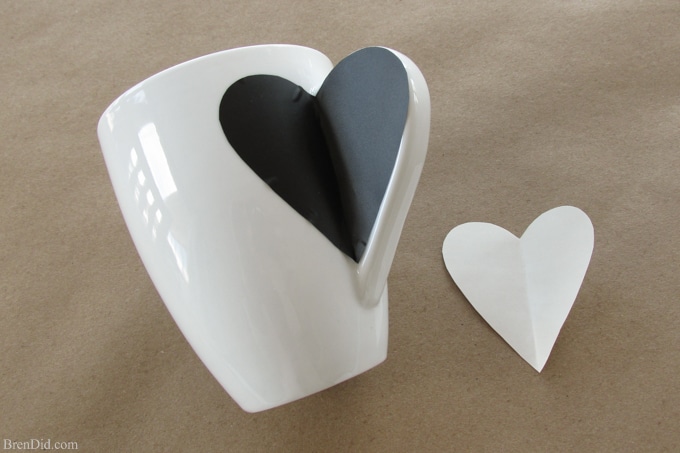
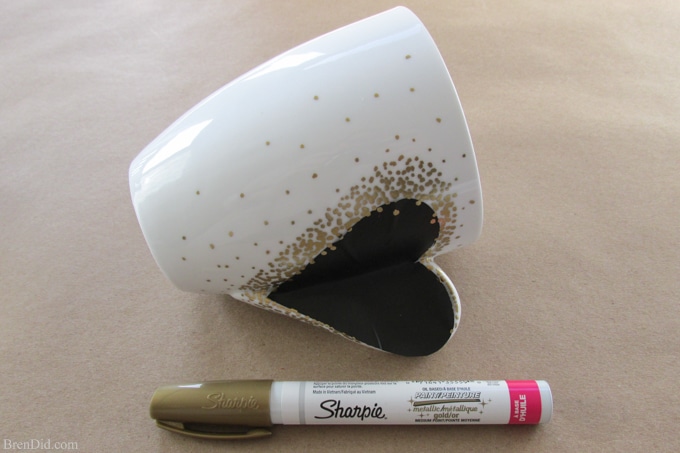
- Fold the contact paper heart in half to stick it to the mug.
- Place the center folded line of the heart along the edge of the handle and then adhere the rest of the heart to the mug as shown.
- Re-position if necessary.
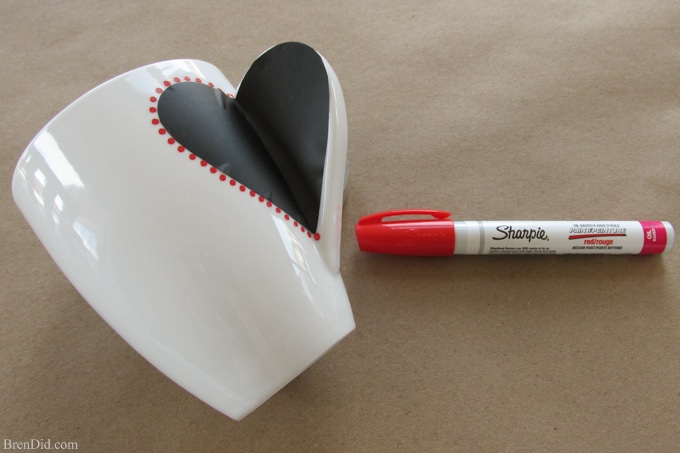
3. Paint the mug.
- Use an oil-based Sharpie paint pen to make a dotted line around the edge of the heart on the mug.
- Push straight down with the marker to keep the dots perfectly round. The paint naturally oozes out in a round shape.
- Do not to mark on top of the contact paper, this will distort the shape of the dots.
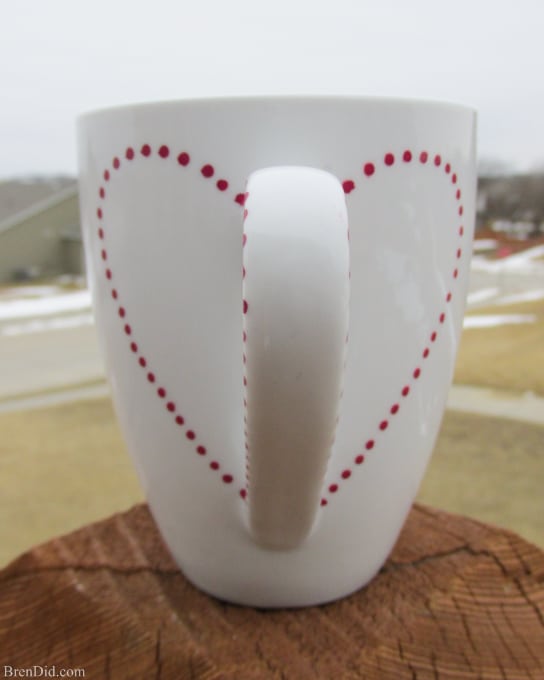
- Allow the paint to dry for at 10 minutes then carefully remove the heart-shaped contact paper then add dots to the handle of the mug.
- Tip: Save the sticky heart shape for the next mug.

- Add more hearts!
- Stick the shape to the opposite side of the handle and add a heart. You get the cool effect below.
- Add a heart to the opposite side of the mug by reattached the contact paper and adding dots.
- Finally, use a fine point oil based Sharpie paint pen to write a message in free hand.
- Example mug says “i love you”

4. Check the end of the post for baking and/or sealer instructions.
Gold Heart Mug Tutorial
1. Prepare the mug.
- Remove all labels then wash and dry each mug. Wipe the surface to be painted with rubbing alcohol or vodka to remove any fingerprints or oils. Allow to air dry.
2. Make a heart stencil to match the mug handle.
- Make and position the stencil following step 2 of the red heart mug tutorial.
3. Paint the mug.
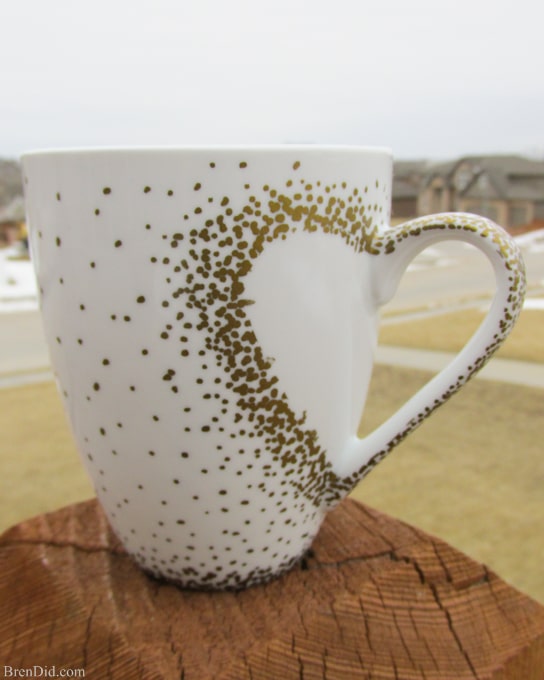
- Use a gold oil based Sharpie paint pen to make random dots around the edge of the heart that is on the mug. Make the dots denser at the edge of the heart and farther apart the farther you go from the stencil.
- Allow the paint to dry for at least 10 minutes then carefully add dots to the handle of the mug. The pattern should be dense on the side of the handle closest to the heart and farther apart the further you go out.
- Add a heart to the opposite side of the mug by re-positioning the contact paper heart and dotting around it again.
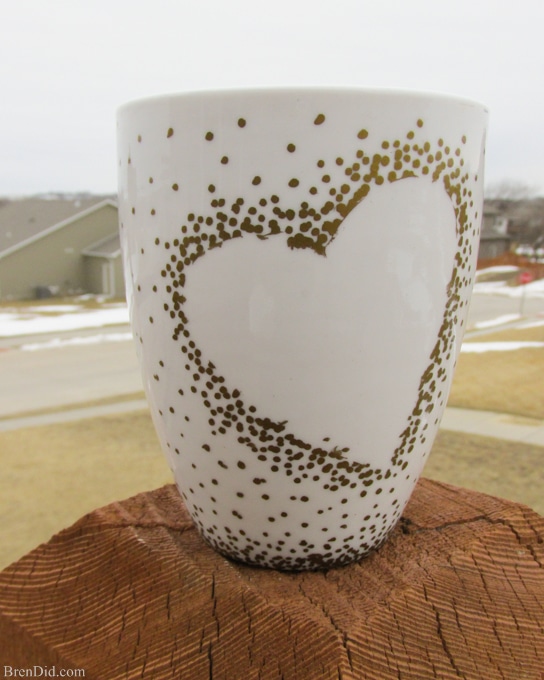
- When the hearts are finished use the pen to randomly place dots in any empty spaces and around the bottom of the mug. The dots at the bottom of mug are dense and farther apart as they move toward the rim.
4. Check the next section for baking and/or sealer instructions.
Baking, Finishing and Care of Finished Mugs
Sharpie (and other oil-based paint markers) will not be embedded into the ceramic glaze of your mug. The only way to get a 100% permanent finish is to go to a ceramic store, add the decorations with kiln safe glazes, then have it fired in a kiln.
However, with a little tender loving care, DIY Sharpie mugs can last a LONG time!
Care Tips
These tips will keep your Sharpie mugs looking new:
- Hand wash the mugs to make the beautiful design last longer. Use a soft cloth or sponge to gently wash the mugs and air dry.
- Sharpie designs are NOT DISHWASHER SAFE. The high temperature and water pressure in the dishwasher will melt the paint away. Hand wash gently.
- Sharpie paint pens ARE NOT food safe. Use them on OUTER surfaces of mugs that DO NOT come into contact with food or drinks. This is true of all Sharpie tutorials and crafts on mugs or dishes, not just this one!
Baking Directions
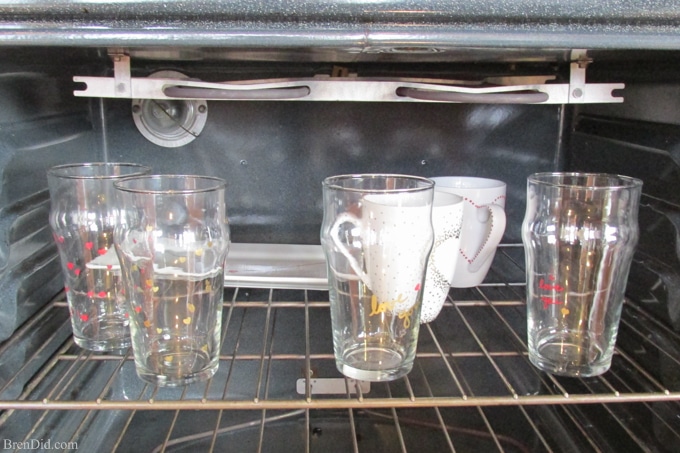
Some DIYers swear that baking the mugs can help the paint fully dry or “cure” more quickly and keep it looking new longer. Others feel that baking is a waste of time. Follow these optional instructions if you want to bake your completed mug:
- Allow the mug to dry for at least 20 minutes then place in a cold oven.
- Heat the oven to 350 degrees and allow the mug to “cook” for 20 minutes.
- Turn off the oven and allow the mug to cool completely
Sealing Directions
Some DIYers like to seal the mugs to add a protective layer over the paint to keep the design looking new longer. Others think that the sealant will damage the design or make the mug unusable. Follow these optional instructions if you want to seal your completed mug:
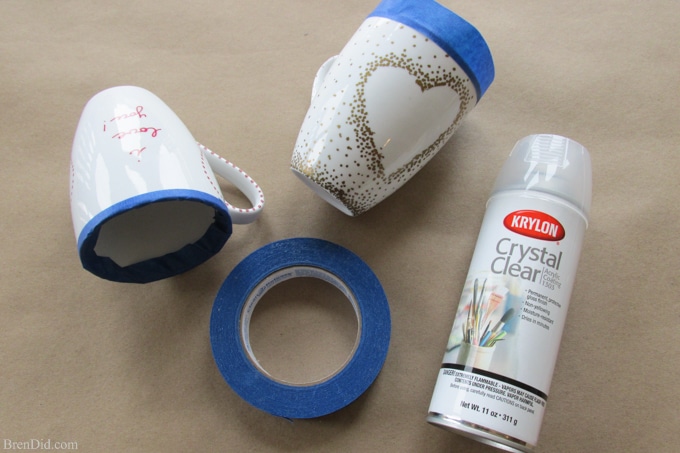
Using Spray Sealer
Tested Spray Sealers: Krylon Crystal Clear or Modge Podge Clear Acrylic Sealer
- Allow the mug to cool completely, if baking.
- Tape off a 1/2 inch band around the top edge, turn the mug upside down, spray the mug with a very light coat. Be careful, the sealer will make the Sharpie run if applied too thickly.
- Allow sealer to dry according to package directions then apply a second coat.
- Allow the sealant to dry/cure completely.
Note: For food safe mugs you must protect the rim of the mug to prevent your mouth from coming into contact with areas that have been painted or sprayed with sealer. Tape off a 1/2 inch band around the top edge with removable tape before applying sealant.
Using Brush on Sealers
Tested Brush on Sealers: Martha Stewart Decoupage Formula or Mod Podge Dishwasher Safe Sealer
- Allow the mug to cool completely, if baking.
- Tape off a 1/2 inch band around the top edge, use a foam brush to quickly and gently apply a thin coat on the mug, do not go over areas a second time this will make the designs bleed.
- Allow the sealer to dry according to package directions then apply a second coat.
- Allow the sealant to dry/cure completely.
Note: For food safe mugs you must protect the rim of the mug to prevent your mouth from coming into contact with areas that have been painted or sprayed with sealer. Tape off a 1/2 inch band around the top edge with removable tape before applying sealant.
Sharpie Paint Pen Project Tips
- Don’t worry about perfection when painting, mistakes can be removed using vodka, nail polish remover, or rubbing alcohol and a q-tip.
- Warning: Sharpie paint pens ARE NOT labeled food safe. Use them on OUTER surfaces of mugs that DO NOT come into contact with food or drinks.
Related Sharpie Crafts
Looking for more sharpie craft like this? Try these projects that come with free traceable patterns:
Love quick craft projects? Sign up for my free newsletter and never miss a thing!

Lindsay
I am making a plate with my class. Is there a way to make it food safe after having the kids decorate it with sharpies? If I baked it and sealed it with with acrylic spray, would this be sufficient?
Thank you so much! Your site have been very helpful with this project.
Bren
The only way to make it food safe is to use a sealing spray that is food safe. I have not found one. Good luck!
Shamim
Hi. Would like to know that if metallic sharpie is used as shown, can you microwave the mug? Will the gold create a spark?
Bren
I am not sure, I would be careful if using the microwave.
Heidi Castagno
Can you microwave the mug after sealing it?
Bren
I have never had trouble but you should test yours to make sure.
Aliah Ulufale
I made pun mugs as gifts , followed directions and used mod podge over it and it completely wiped the drawn pic away but not the words . I drew a pic of grapes and put you are grape under it and the mod podge made the grapes disappear. Tried the heart thing you had on another same thing . Is it supposed to do that?
Bren
No, the mod podge should not erase the design. Check the formula you are using, the company makes several versions.
Marilyn Grice
I use alcohol ink and I want to do a mug. Do you think krylon triple thick would work as a sealer? Thanks
Bren
I’m not sure, I’ve never used that combo. I would test it on a spare mug before using it on your whole project.
Nancy Sullivan
I made a few mistakes when doing my dots. I did discover that I can erase them with finger nail polish. That might be helpful for others. I found Qtiips to work great for fixing the mistakes.
Susan R
My local library sponsored this last week. When I baked my mug, the dark and light blue portions of my design turned an unappealing mustardy brown 🙁 Is this typical? The directions they gave said to heat to 425. Maybe it was too much heat?
Do you think I could go over those areas and leave to cure without heating? Or maybe the dishwasher-safe Mod Podge? What do you recommend?
Thanks!
Bren
I would give each a try… it can depend on the mug’s original glaze and the pens being used. Luckily it call all be removed with nail polish remover if you don’t like the results.
Louise Roux
I want to make coffee cups as gifts at a weekend away. Can I bake the cups a week after it has been painted?
Bren
Yes
Anna
If I use Mod Podge Clear Acrylic Sealer, is it still important to bake beforehand?
Bren
I have not tried it baked vs not baked. You may want to do a test.
Valerie Hill
I had my kids do some test mugs before we made our final ones as gifts. With no glaze they seem to be holding up to regular hand washing, but the oil based marker seems really easy to scratch off. It comes of right away with a finger nail. If people are putting them in a sink to wash with other dishes, I worry the color will scratch off. Do you have any suggestions. I’m not sure about the Krylon, because it doen’t seem food or microwave safe at all. Any suggestions would be appreciated.
Bren
Did you wipe the surface with alcohol or nail polish remover before starting? You could try sealing with Mod Podge dishwasher safe or just allow the paint to dry for a few days to see if that makes it more permanent… it tends to “harden” with time.
Archie
Is it necessary to bake them if we’re using the cups only as decoration? Will the ink fade if not baked?
Bren
No, you can just let the paint dry if just using as decor.
JoJo
I am starting a coffee cup club at my job where people can buy a cup decorate it and have it hanging up. its their mug. Such a cute idea right?! Here is my question, we don’t have an oven. So has anyone tried the microwave method and did it work.
Bren
I’ve never tried the microwave method but I have heard of people just letting the Sharpie paint markers dry for 48 hours and then using the mugs without baking. Make sure to hand wash.
Shayne
Are these mugs washable and/or microwavable?
Bren
Shayne, you should hand wash the mugs. I have not had a problem with them in the microwave.
Krista
Thanks for the great tips. Just bought some markers and some mugs. I see cute plates done too. Are there any markers that ARE food safe?
Bren
Krista, I have never found any food safe markers. You can do the back of glass plates since the design with show through but you eat off the unpainted glass side.
Emily
My little guy is having trouble using the pens on the round mug, if I were to buy paint that he can use with a brush, any advice on what kind of paint will work to do this? I still want to bake them.
Bren
Emily, I would check your local craft store for glass or porcelain paint. You have to check the specific paint for baking directions.
Atile
If I use the mod podge, do i have to bake the cup again
Bren
If you use Modge Podge I would follow the directions on the label. Good luck!
Joy-Lily
Thanks so much for your clear and complete instructions. I’ve been looking through many websites for this DIY information. None of the others mention double curing, sealer or that the Sharpies are not food safe. Now I feel confident to get on with my Zentangle designs on mugs.
Bren
Thanks!
Lillah Harris
Hi Bren,
I appreciated your tips because I have tried a few different baking methods to get my Sharpie paint pens to last through hand-washing but nothing is working 😕 My first mugs I baked at 450 F for 30 mins. When the mugs cooled some of the paint had turned brown and after one or two hand washing’s it was fading away completely. The second try I baked at 250 F for two hours. After cooling the paint looked great! But I have only washed one time and I can already see fading again…ugh! So frustrating. I am eager to try your “twice baked” method. Also, I think the Krylon sealer may do the trick. Where do you purchase the sealer? How long does it take to dry? Should the sealer be baked as well? Any other tips? Thanks in advance! 🙏🏼
Bren
Lilah, you can get the sealer at a craft store or home improvement store. I think I bought mine at Michael’s. It dries pretty quickly but I would let it sit at least 24 hours before washing. I did not bake the sealer.
Nikki
Seriously cute idea! I love both designs. Thanks for the post.
Bren
Thanks Nikki!
Roberta
Bren! These are so cute and fun!!! You won me over with them! But I gotta tell you, I bought everything needed, markers and the same mugs you used, but I’m afraid to try it! Haha!!! I’m scared I’m going to mess it up! Isn’t that silly?! I just re-read the whole tutorial and noticed you mentioned it’s easy to clean any mistake with alcohol or vodka with a q-tip, so now I’m a little more relaxed about it, but still a bit nervous. I’m taking a shot at it with one of the mugs this weekend (I bought 4). So if anything, it’s just one of them and not all 4! lol
Wish me luck! I’ll let you know how it turns out! Thanks for the inspiration.
Marilyn
Adorable and just in time for Valentine’s Day coming upon us with great speed. Even I can probably pull these off.
Thanks.
Bren
I hope you enjoy the project, Marilyn!
Mellany
Hello Bren,
Which krylon spray do you use and can you also write a message inside the mug and spray it inside with the spray to make it able to safely drink from the mug?
Thank you in advance and such a beautiful mugs you made.
Kind regards,
Mellany
Bren
Thanks for the questions, Mellany. As I mention in the post, Sharpie paint pens ARE NOT labeled food safe. Use them on OUTER surfaces of mugs that DO NOT come into contact with food or drinks. The sealer I used was Krylon Crystal Clear. No, you cannot write on the inside, spray it and have it be food/drink safe. The only way to make the inside food safe is to go to a pottery store and have the design baked on with glaze.
Emma
I accidentally bought mugs with a gold rim, 🙁 if i put them in the oven they will most likely explode! Is there any other way to not do the oven step?
Thank you!
Bren
Emma, people make the craft without baking so that might be your best bet. Sorry, I’m not an expert at gold rims on mugs! Good luck!
Kaza
Wow you have won me on this project. I have just bought 2 sets of glasses to do for friends and can’t wait to see how they turn out. Thanks Bren
Safia
Hi these turns great…adorable mugs
I want to buy sharpie but not sure of the tips sizes.
What is the tip you used is it medium or fine tip???
Bren
I use the medium tip to make dots and the fine point to write the words. Hope you have fun making them!
Sara
When I used the sealer, it smeared the sharpie. Do you have any suggestions. Also, if I don’t use sealer will they still last through washing?
Bren
I used the sealer in a attempt to make the mugs last longer. As I mention in the post you have to spray a very fine mist or it will run. The Sharpie should still last through hand washing with or without the sealer. However, since it is not a baked on glaze it will eventually start to fade. I hand wash mine with no problem.
Rhonda CLawrence
Hi Bren, I LOVE this project! I wanted to know can I use any mug that is oven safe for this project?
Bren
Yes, it should work on any mug that is oven safe. Thanks for the lovely compliment!
Tina
Hello, trying this out, do we have to pre-heat oven prior to putting the cups in or do we just put in and turn on? Does it require repeating the same batch? Or is once good enough ?
Bren
Put the mugs in the cold oven. I bake mine twice, cooling in between.
Ashley
When does the twenty minute period start? I’m doing it and I was wondering if the twenty minutes includes the time it takes for the oven to preheat? Or does the twenty minutes start after the oven has finished preheating?
Bren
Start timing when you place the mugs in the oven.
Victoria C Estrada
Hi Bren, thanks for the awesome tutorial! If you use the mod podge acrylic sealer, can you put the mug in the microwave?
Bren
Victoria, I am not sure about Modge Podge in the microwave! I would double check on their website.
Linda
These are so cute. Very good tutorial too.
Bren
Thanks Linda!
Shannon
Hi Bren! Would this work with regular sharpies? I bought the wrong ones on accident, and hoping I don’t have to return them?!
Bren
Shannon, I have seen a few tutorials using regular sharpies however I have also heard that these tend to wash away after a few uses. The oil based sharpies tend to be more durable and stand up to washing better. Hope this helps! -Bren
Shannon
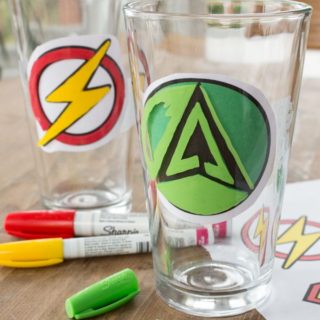
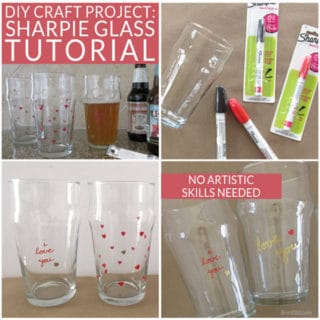
Hi Bren, could you do this with wine glasses or tumblers?
Bren
Yes! I used the same concept to make Pint Glass, check out the tutorial!
Svatia
Ive tried it and it looks cute, but the golden sharpie turned into grey after baking. so now its still ok, but its much less fabulous 🙁
Bren
So sorry yours didn’t work! Did you use oil based Sharpie paint pens? The photos are from baked oil based sharpies. The gold turned out great for me, even after baking.
Svatia
Yeah, I did :/ I baked it 50 degrees higher than you. I wonder if that could do the trick (seems unlikely)…maybe its the mug itself. Like the original glaze or something. Ill try again…:)
Jennifer Miller
Seriously cute. I’ve seen these before but you make them look easy!
Bren
Thanks! They are easy, you should try making some.?
Ayana
Omg cool I will definitely try that and give it as a gift where can u get those cups from??
Bren
Thanks Ayana. The mugs I used are from Pier One Imports. They are called “Luminous”.