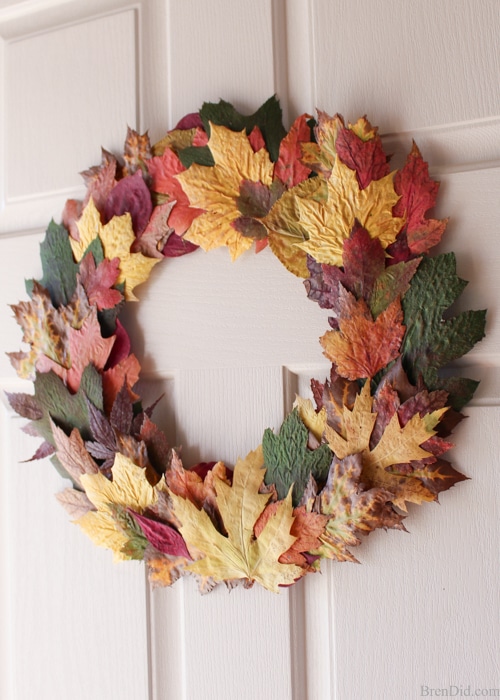
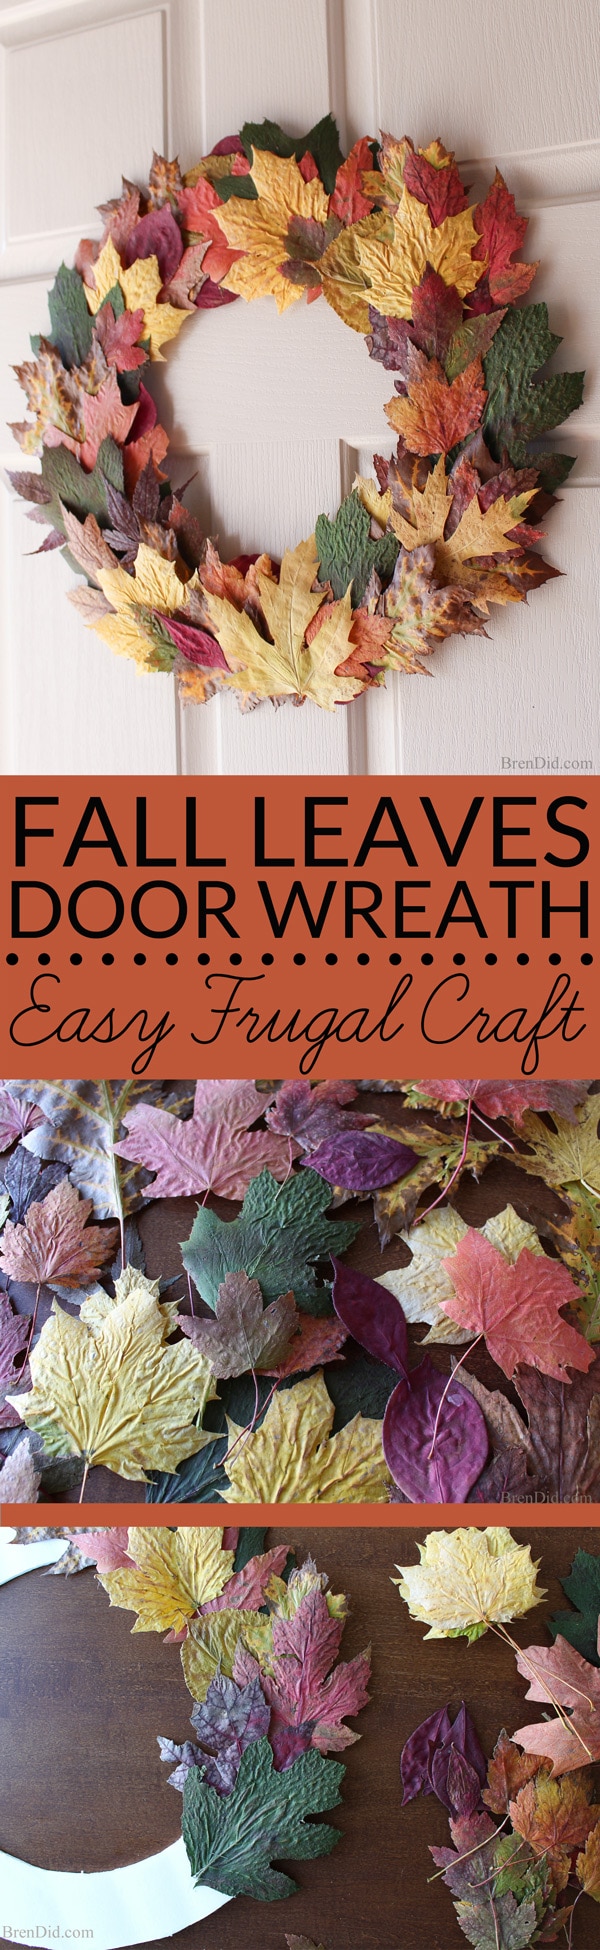
Decorate your front door for fall with this gorgeous fall leaves wreath for $0! You’ll save money and storage space… plus the biodegradable wreath can be throw it away at the end of the season with no guilt.
This post uses affiliate links. They don’t cost you a thing and help us bring you creative projects. Read more in Policies & Disclosures.
Fall foliage is my favorite part of autumn!
I love the way nature show us the seasons are changing.
Each day the trees seem to be a new, beautiful color until finally, after a stormy evening or windy afternoon, their limbs are bare and winter has arrived.
Fall Bouquets
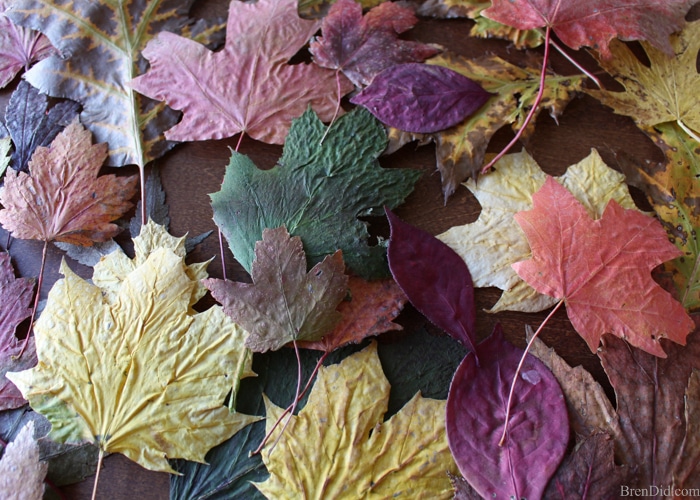
My husband brings me bouquets of beautiful fall leaves when he walks the dog. I love the variety of colors and have always wanted a way to preserve these leaves…
Unfortunately, beautiful leaves gathered one afternoon are usually a brown curled-up mess the next morning.
Ugh!
I’ve tried pressing fall leaves between books, but it takes weeks to accomplish and the leaves are still drying when fall is over. I wanted a way to immediately use the leaves for Thanksgiving décor.
I tested a few methods of drying fall leaves and stumbled onto an easy way to quickly preserve leaves. This method keeps their colors bright and makes the leaves lay flat.
A bonus… it’s FREE and FAST!
No special craft supplies needed!
Easy Fall Leaves Preservation
My easy method for preserving fall leaves involves a microwave and an iron. While this seems like an odd crafting combination it works remarkably well.
How to Preserve Fall Leaves for Decorating
- First, collect fall leaves that are freshly fallen without damage or holes. (No old, dried out foliage.)
- Next, cure the leaves by zapping them for few seconds in the microwave. (This step removes most of the water from inside the leaf.)
- Finally, press the leaves flat with a hot iron. (This removes any remaining water leaving them completely flat and dry.)
How to Make a Fall Leaves Wreath… for Free!
Front door wreaths are a beautiful addition to your home but they are expensive to purchase and take up lots of storage space.
Luckily the pressed leaves are easy to make into a wreath that is perfect for autumn and Thanksgiving. The wreath costsjust a few cents to make (it is made with fall leaves and cardboard) and is biodegradable!
I love being able to enjoy the fall colors and then simply throw the wreath away. (No storage space needed once it is out of season.)
Fall Leaves Wreath Supplies
- Fall leaves (60-70 fresh leaves for a 16” wreath)
- Cardboard or heavy duty cardstock to make a wreath form
- Stapler and staples
- Craft glue or glue gun
- Twine
- Parchement paper
Fall Leaves Wreath Directions
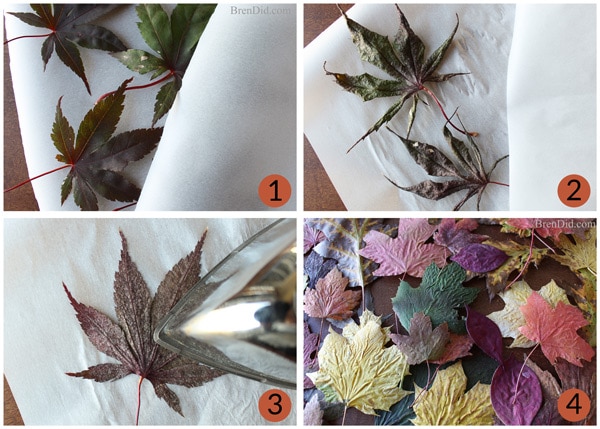
Step One – Dry and Press the Leaves
- Work in batches of 5-6 leaves. Place the leaves between two sheets of parchment paper and microwave for 10-30 seconds, turning once.
- Check the leaves every few seconds, microwave until they feel dry but not brittle.
- Using a hot iron, press the leaves until they are flat. You can place the leaves between sheets of parchment paper so they do not touch the iron. (I press my leaves without parchment paper.)
- Continue microwaving and ironing until all the leaves are pressed
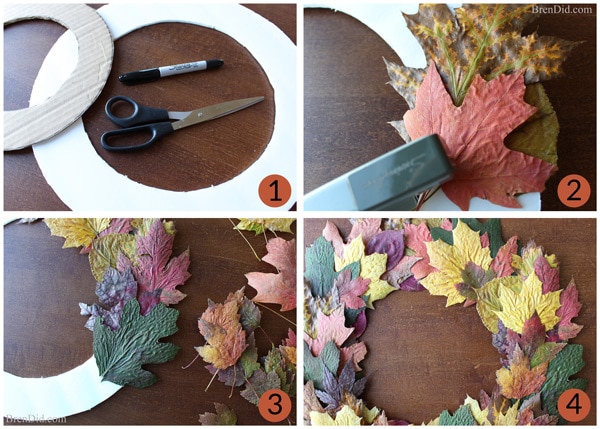
Step Two – Assemble the Wreath
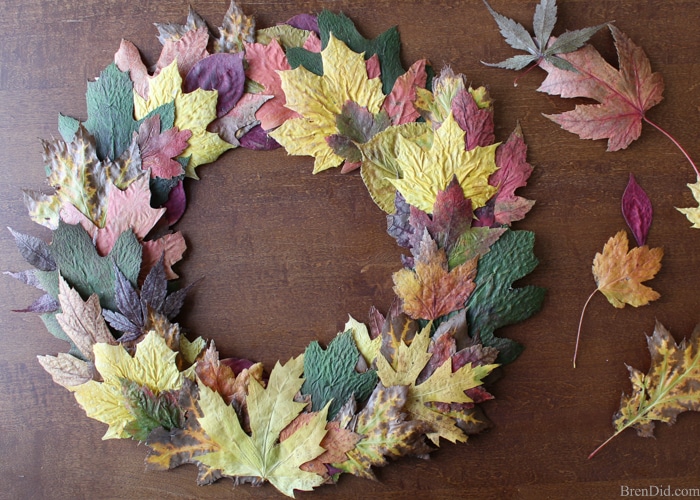
- Make a simple wreath form by tracing circles onto corrugated cardboard. (I trace a large round plate for the outside circle and a small plate for the inside circle.) Cut out the form.
- Work from the top of the wreath form, slightly to the right of the center. Gather a few pressed leaves into an bunch and staple them to the cardboard form. Place the staple slightly above the stem.
- Align the next group of leaves so the tops of the leaves cover the last staple. Continue stapling leaves around the form until one half is covered with leaves then move to the top left and staple leaves down the opposite side.
- When the wreath is entirely covered use craft glue or hot glue to position a few leaves over any visible staples. You can also add a few additional leaves to any areas that look bare or uneven. (I add a few the the center bottom.)
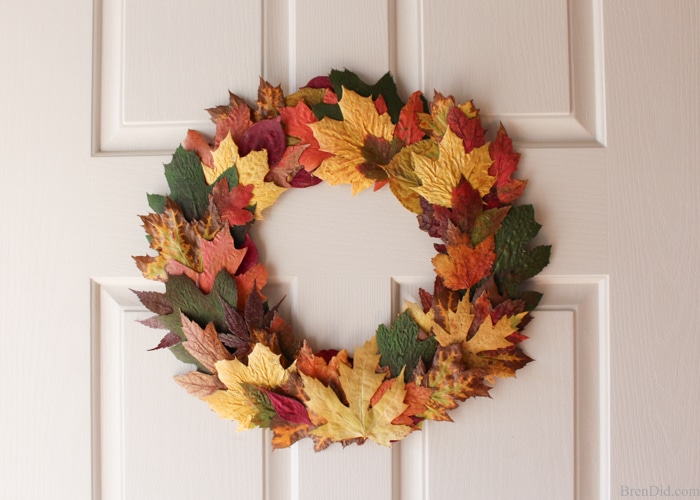
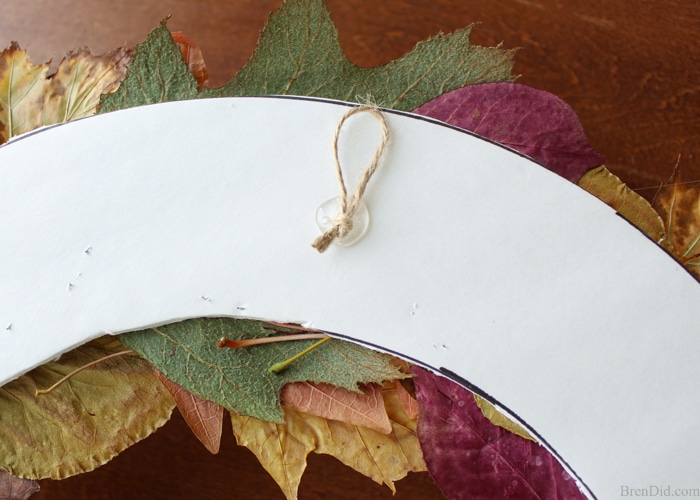
Step 3 – Hang the Wreath
Glue a loop of twine, yarn or string to the back of the cardboard for hanging. Allow glue to dry completely before displaying.
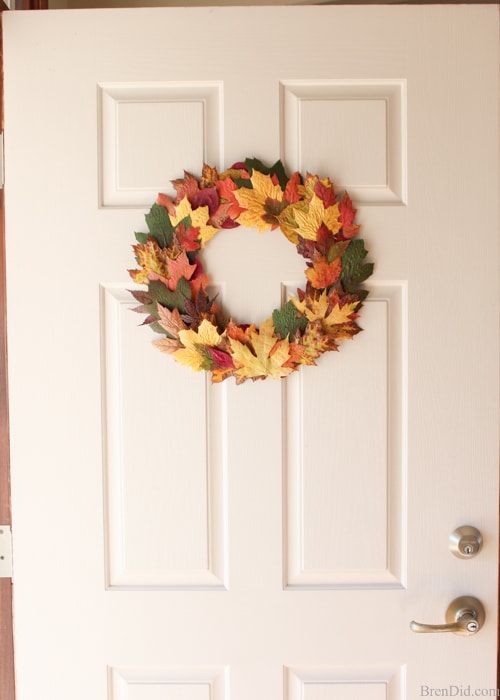
How to Hang a Wreath on a Door
Hang your wreath using mini Command Adhesive hooks. The wreath is very light, so the removable strips will hold it securely without damaging the front door. No nails needed!
Other Fall Leaves Uses
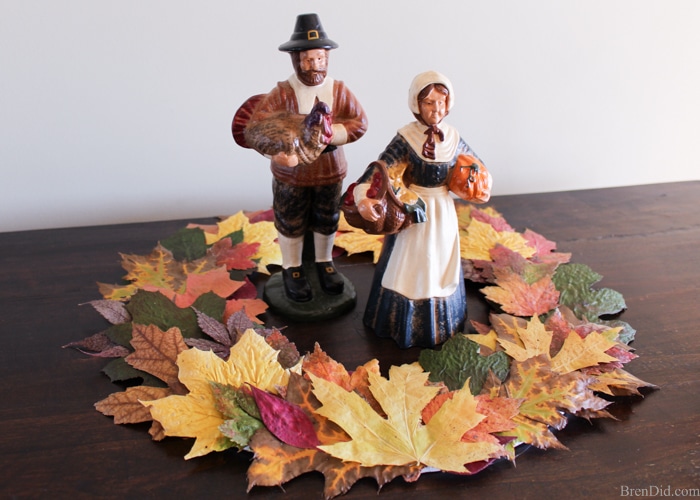
The wreath can also be use as table decoration or centerpiece. I’ve been using mine to dress up a pair of pilgrims.
More Natural Wreaths
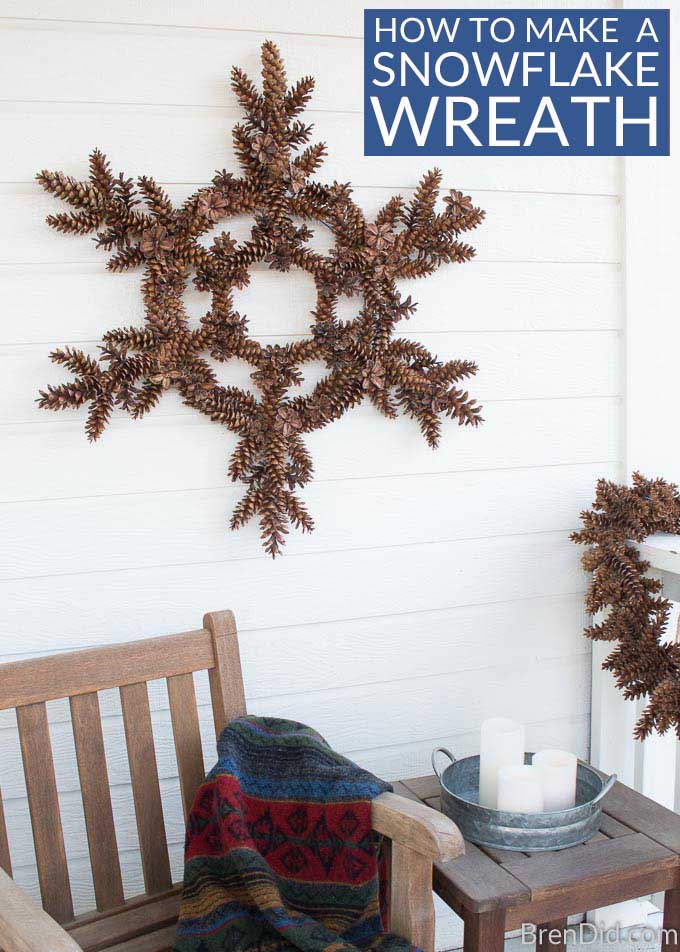
Looking for an easy winter wreath? Use pinecones to make this adorable (and affordable) pinecone snowflake wreath.
These 16 natural fall wreaths are perfect for autumn decor and cost almost nothing to make.

Like my easy craft tutorials? Sign up for my newsletter and never miss a thing!


Ina Hopkins
My Garden Club’s Youth Committee will be using this craft for a program with our school garden club. What a fun craft for them to take home.
Kevne
This is exactly what I was looking for. I made the leaf collecting an activity for my toddler and I to do together.
I used a glue gun for assembly and other than being a bit light weight for the windy Seattle weather (easily corrected by heavier cardboard backing) the wreath has held up remarkably well.
This will be a my go-to fall project from here on out!
Ghada
Hi there!! Just stumbled across this. I don’t have a microwave – could I put them in the oven for a bit and just monitor?
Bren
Sorry, I’ve never tried the oven. Let me know if you do and have success!
Kaye
This is pretty! What s way to recycle! The children can help too, absolutely love it!!
Bren
Thanks, Kaye!
Sheila Koty
I LOVE your site and wish that I had found it before now!! I am going to make this wreath plus the laundry detergent (picking up the supplies from WalMart today), Lemon cleaner and more and more 🙂
I suffer from migraines and allergies and have learned so much from you and the links that you provide. Who knew that our grandmothers and great-grandmothers had it right all along and we must ‘re-learn’ what they took for granted. It is a small bit of extra effort that pays off in spades!
Thank you for all the time and effort that it takes to create a site such as yours!
Sheila 🙂
Bren
I’m so glad you’re enjoying the site, Sheila. Welcome!
Petra Tomkins
This wreath is fantastic and just what I’m looking for. I hope to try it out tomorrow after I’ve picked up some leaves.
I find that here in England any autum things in the shops are very expensive , this helps me a lot.
Thanks for sharing.
Bren
Thanks, Petra! Hope you enjoy the wreath!
Helen Staniewicz
What a great idea! Beautifully done yet so simple.
Bren
Thanks, Helen!
Coby
Hi Bren, I like this idea very much, and i have share it with my community on facebook.
(creahoek voor iedere creabea)
I hope this is permitted, i have put your name as the maker of this beatiful craft idea.
Thank you so much for sharing this with us.
Bren
Thanks Coby!
Diane.crispino
What did you use to secure the leaves to the cardboard did you use glue . The reviews are beautiful ,
Bren
I use staples. Check out the instructions in the post above for the full details.
Dana
Hey Bren. I love this idea. I live in the south where tree leaves really don’t change color. And if they do its brown. Ever painted any of the leaves you have dried? Just wondering if I could take the brown ones that fall and dry them then paint them to come out with something similar. Course that would cost a little bit with the spray paint. But I always have spray paint on hand 😀
Bren
I have never painted the leaves, sorry! Let me know hoe it works if you try it.
Lisa
Hi this wreath is beautiful! I have a question. When you preserve the leaves this way are they brittle? If not do they become brittle later on? Thank you
Bren
Lisa, they do get a little brittle especially if you over dry the leaves. The wreath will get more brittle over the season, I throw mine away at the end of the season since it is biodegradable and nearly free then make a new one each fall.
Ann Bacon
Absolutely beautiful! I will have to give this a try since our leaves are just starting to turn. Thank you so much for sharing this wonderful idea!
Bren
Thanks Ann!
Linda
A question: Could you use this process, then spray the leaves with polyacrylic and then frame them for use as a picture? I wonder if they would keep their color or if you would need to wait until they lose it? Any suggestions would be appreciated.
Bren
You’d have to test the polyacrylic method, I’ve never tried it. My mom makes beautiful fern pictures by simply drying the fronds (leaves), attaching them to paper or cardboard, and framing them. She does not use any type of sealer and they keep their beautiful color. I would probably try this method first and see how it works before moving on to the messy/smelly polyacrylic. Good luck! Let me know how it turns out.
Audrey
I really love this wreath! Fall is my favorite time of year and the leaves are just beautiful on this wreath! I do have a question. I a little confused about step 3. “Using a hot iron, press the leaves until they are flat. You can place the leaves between sheets of parchment paper so they do not touch the iron. (I do not use the parchment paper in this step.)” You say to place the leaves between parchment paper to press but then in parenthesis you say you do not use parchment paper in this step. Could you please clarify this for me? Thank you for sharing how you make this beautiful wreath!!
Bren
It’s your choice, Audrey. You can use the parchment paper if you do not want the leaves to touch your iron or ironing board. I don’t mind the leaves touching my ion so I do not use the parchment paper. Hope you like the wreath!
Cindy Pickering
Bren, thank you so much for this great post!! I love crafts that cost nothing!! And I too used to walk the dog and pick up leaves, but the next day they were crumbling and shriveling up! I always wondered if there was a way to do this–I believe Martha Stewart published a way to preserve them, but it required chemicals I did not have and did not want to use! This is perfect, and your wreath is just absolutely gorgeous! Sadly, I live in San Francisco now and we don’t have much in the way of fall color! But I will take a day trip just to find some!! Thank you so much for this and hopefully lots more good ideas since I subscribed today and cannot wait to look around on your site!
Bren
Thanks Cindy! I do love crafts that cost nothing or very little and I agree, I do not like to use unnecessary chemicals. You should check out my Halloween mummy luminaries and Valentine lanterns… they are made from recycled jars and cans.
Cindy Pickering
Those little mummies are adorable!! And you can make a display with all different sizes if you don’t need to put candles or tea lights in every one [I have some small horseradish jars I couldn’t bear to toss and they would make great small ones for small areas!] I love this idea! My house will be very spooky this Halloween thanks to you!
Bren
Thanks Cindy!
Christine B.
Of course this is feature-worthy (and sorry it’s taken me a few days to say so)! I SO love this idea and I NEVER would have guessed you could use real leaves like this. Such a handy trick! I love it!!
Bren
Thanks Christine!
Kim
What an awesome idea! You should see the beautiful leaves on my porch right now! We’ve drowning in rain and they are piling up! I am so going to try this! Thanks for linking up to Merry Monday! Sharing on FB! Have a great week!
Kim
Bren
Thanks Kim!
jenfliesaway
Remind me of this next year! Our leaves are already either in the compost bin or mulching the garden.
Bren
You can pin it here.